Dismantling
1. Remove the cylinder head gaskets.
V8 engine, ENGINE OVERHAUL, Cylinder head gasket.
2. Take out a back epiploon of a cranked shaft.
V8 engine, ENGINE OVERHAUL, Rear crankshaft oil seal.
3. Remove the lower front timing cover.
V8 Engine, ENGINE OVERHAUL, Lower Timing Cover.
4. Remove connecting rod bearings.
V8 engine, ENGINE OVERHAUL, Connecting rod bearings.
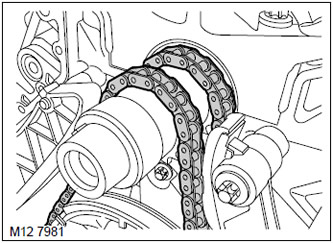
5. Remove the timing chain from the crankshaft sprocket.
6. Remove the oil pump drive chain from the crankshaft sprocket.
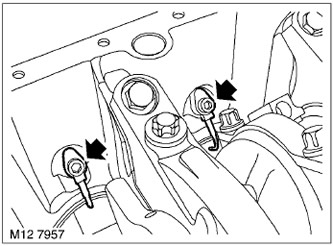
7. Turn away bolts of fastening of oil atomizers and remove atomizers.
8. Push the connecting rods up so that the bottoms of the pistons are flush with the top plane of the cylinder block.
Disassembly
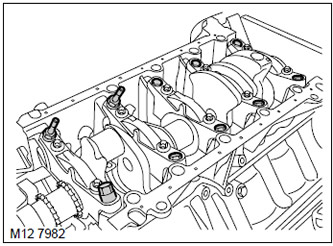
1. Remove 10 adjustable-spacer main cap bolts. Dispose of the bolts.
2. Remove the 10 bolts securing the main covers to the cylinder block and save them for later use.
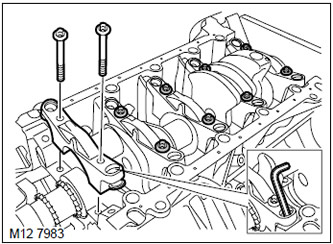
3. Loosen and remove the 5 main caps using adjustable spacers.
NOTE: The mounting tabs on the main bearings must line up with the grooves. Root covers from 1st to 3rd are marked, thrust rings are installed on the 5th root cap. Root cap #4 is not marked.
4. Remove the crankshaft from the cylinder block.
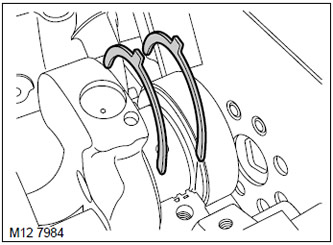
5. Take out loose leaves from the block of cylinders and radical covers and utilize them.
6. Take out persistent rings.
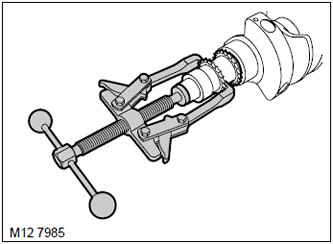
7. Using a puller, remove the sprocket from the crankshaft.
8. Remove the key from the crankshaft.
Examination
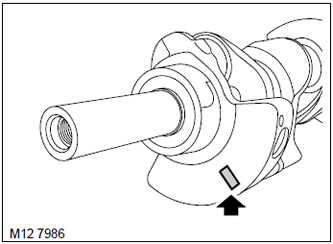
1. Check the color mark on the front of the crankshaft to see if the crankshaft has been ground to oversize.
TECHNICAL DATA, Engine - V8.
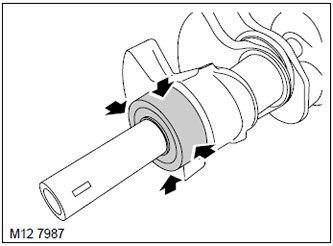
2. Measure the diameter of each main journal and record the results. Take 4 measurements at 90°intervals on each main journal, determining size and ovality.
TECHNICAL DATA, Engine - V8.
3. If wear and/or out-of-roundness exceed the allowable values, then the main journals must be ground to the repair size.
TECHNICAL DATA, Engine - V8.
4. Wipe the crankshaft, carefully blow out the oil channels.
5. Wipe the main covers and bed liners in the cylinder block, blow dry the sockets of the main bolts.
6. Wipe off the old main bolts and lightly oil the threads of the main bolts.
7. If the crankshaft or main bearings are replaced, regardless of the color coding of the old bearings, use only yellow-coded bearings of the correct size.
TECHNICAL DATA, Engine - V8.
8. Lubricate the liners with engine oil.
9. Carefully install the crankshaft into the cylinder block.
10. Fully screw the adjustable spacers into the main caps.
11. Install the proper size and color coded main bearings in the main cap.
TECHNICAL DATA, Engine - V8.
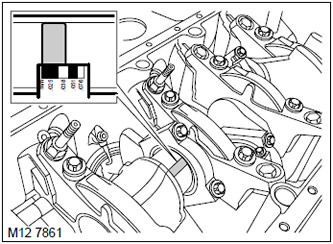
12. Place a strip of deformable calibration material on the main journal ("plastigage").
13. Establish radical covers and screw in old bolts. Tighten the bolts evenly and sequentially to a torque of 20 Nm, and then, using a goniometric torque wrench, tighten the bolts another 100°.
CAUTION: Do not turn the crankshaft while using the calibration material.
14. Consistently loosen and remove the main bolts, remove the main caps and bearings.
15. Using a special ruler, measure the width of the calibration strip and use this value to determine the amount of clearance on each main journal.
TECHNICAL DATA, Engine - V8.
16. If the values do not correspond to the allowed values, then you need to choose another insert (And) from the size group and repeat the gap measurement.
TECHNICAL DATA, Engine - V8.
17. Remove the crankshaft and remove all traces of calibration strips from the main journals using clean engine oil and a cloth.
18. Install approved liners in the main covers.
19. Lubricate the main journals and approved main bearings with clean engine oil.
20. Install the crankshaft and main caps 1 through 4.
21. Wipe the thrust rings.
22. Lubricate thrust rings with clean engine oil.
23. Insert approved thrust rings into the cylinder block.
CAUTION: The grooves on the thrust washers must face the crankshaft.
24. Install approved thrust rings in the 5th main cover and install the cover on the cylinder block.
CAUTION: The grooves on the thrust washers must face the crankshaft.
25. Screw in the old main bolts, evenly and sequentially tighten the bolts to a torque of 20 Nm and, using a goniometric torque wrench, tighten them by 100°.
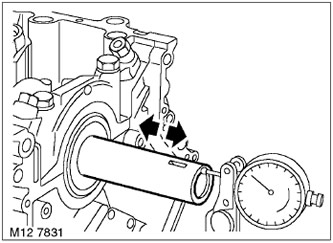
26. Mount indicator with stand as shown. If the axial movement of the crankshaft does not correspond to the permissible value, then unscrew the bolts of the 5th main cover and remove the thrust rings.
TECHNICAL DATA, Engine - V8.
27. Select thrust washers of the required thickness and ensure that the axial movement of the shaft is within acceptable limits.
TECHNICAL DATA, Engine - V8.
28. Lubricate approved thrust rings.
29. Insert approved thrust rings into the cylinder block.
CAUTION: The grooves on the thrust washers must face the crankshaft.
30. Install recognized thrust rings in the 5th main cover and install the cover on the cylinder block.
31. Remove and discard the old cap screws 1 through 4.
Assembly
1. Install new main bolts. Tighten the bolts to a torque of 20 Nm, and then tighten them by 100°.
CAUTION: Do not attempt to remove the special coating from new bolts.
2. Tighten the adjustable spacers to 10 Nm.
3. Screw in the new tie bolts through the adjustable spacers and tighten them to 20 Nm and tighten them an additional 45°.
4. Wipe the crankshaft sprocket and the seating surface on the crankshaft nose.
5. Wipe keys and keyways.
6. Install the key in the groove of the crankshaft.
7. Heat the crankshaft sprocket to at least 150°Celsius and put the sprocket on the shaft.
Assembly
1. Wipe oil nozzles and mating surfaces.
2. Install the oil nozzles and tighten the mounting bolts to 10 Nm.
3. Install connecting rod bearings.
V8 engine, ENGINE OVERHAUL, Connecting rod bearings.
4. Wipe the oil pump drive chain
5. Lubricate the oil pump drive chain with clean engine oil.
6. Install the oil pump drive chain to the crankshaft sprocket.
7. Put the timing chain on the crankshaft sprocket.
8. Install the lower front timing cover.
V8 Engine, ENGINE OVERHAUL, Lower Timing Cover.
9. Establish a back epiploon of a cranked shaft.
V8 engine, ENGINE OVERHAUL, Rear crankshaft oil seal.
10. Install the cylinder head gaskets.
V8 engine, ENGINE OVERHAUL, Cylinder head gasket.
Comments on this article