WARNING: When servicing vehicles with xenon headlights, the following precautions must be observed. Failure to follow these precautions may result in exposure to ultraviolet rays, serious electric shock, fire, and the risk of explosion.
- Make sure the headlights are off at all times when working.
- Eyes and hands must be protected
- Never turn on or test lamps while they are disconnected from the holder.
Removing
1. Right headlight on V8 models: Remove the air cleaner.
ENGINE MANAGEMENT SYSTEM: V8 engine, REPAIR WORK, Air cleaner housing.
2. Remove the forward combined lantern of dimensional light and index of turn.
LIGHTING, REPAIRS, Front Combination Lamp - Parking Light and Turn Signal.
3. Do not damage the bumper.
CAUTION: Always be careful not to damage the paintwork before removing/installing panels or bumpers.
4. Remove the headlamp wiper arm.
WIPERS AND WASHERS, REPAIR WORKS, Headlight wiper arm.

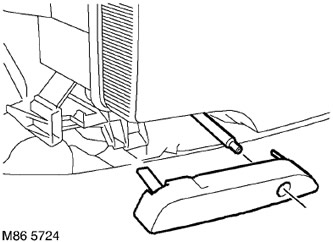
5. Remove the headlamp cleaner drive shaft guard.
6. Remove a forward facing of a radiator.
EXTERIOR PARTS, REPAIR WORKS, Radiator grille.

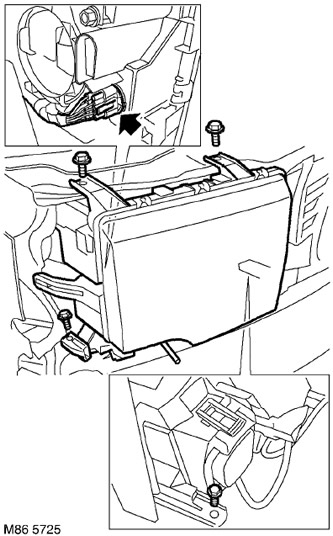
7. Turn away 4 bolts of fastening of a headlight.
8. Move the headlight forward, disconnect the block and remove the headlight.
Installation
1. Install the headlight and attach the block.
2. Install the headlight in the lower mount, install the bolts and tighten them with a torque of 6 Nm.
3. Reinstall the front grille.
EXTERIOR PARTS, REPAIR WORKS, Radiator grille.
4. Reinstall the headlamp cleaner drive shaft guard.
5. Install the headlamp wiper arm.
WIPERS AND WASHERS, REPAIR WORKS, Headlight wiper arm.
6. Install the front combined side marker and turn signal lamp.
LIGHTING, REPAIRS, Front Combination Lamp - Parking Light and Turn Signal.
7. Check headlight adjustment and, if necessary, adjust headlights.
LIGHTING, ADJUSTMENTS, Headlight - adjustment of light beams.
8. Right headlight on V8 models: Install the air cleaner.
ENGINE MANAGEMENT SYSTEM: V8 engine, REPAIR WORK, Air cleaner housing.
Comments on this article