Dismantling
1. Remove the top overlay of the control panel from the driver's side.
VEHICLE INTERIOR PARTS, REPAIR WORKS, Control panel top trim - driver's side.
2. Remove the top overlay of the control panel from outside the passenger.
VEHICLE INTERIOR PARTS, REPAIR WORKS, Control panel top trim - passenger side.
3. Carefully release the clips securing the center vent to the top panel. Remove the ventilation grill.

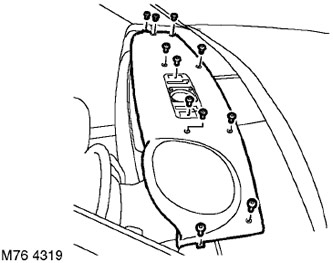
4. Remove the 11 Torx screws securing the top tray to the control panel, carefully slide the top panel back and separate it.
5. Disconnect the speaker connector block and remove the top tray.
NOTE: If disassembly was carried out only to provide access to other elements of the system, then further disassembly operations should not be performed.
6. Remove the 4 Torx screws securing the speaker to the top tray and remove the speaker.

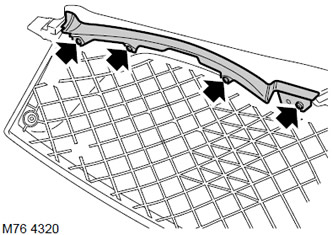
7. Turn out 4 Torx screws of fastening of the top decorative slip of the panel of devices and remove an overlay.
Assembly
1. Install the instrument panel top trim to the top tray and secure with Torx screws.
2. Install the speaker and fix it with screws.
3. Position the top tray on the control panel, attach the speaker block. Secure the top tray to the control panel with Torx screws.
4. Install and secure the center grille.
5. Establish the top overlay of the control panel from outside the driver.
VEHICLE INTERIOR PARTS, REPAIR WORKS, Control panel top trim - driver's side.
6. Establish the top overlay of the control panel from outside the passenger.
VEHICLE INTERIOR PARTS, REPAIR WORKS, Control panel top trim - passenger side.
Comments on this article