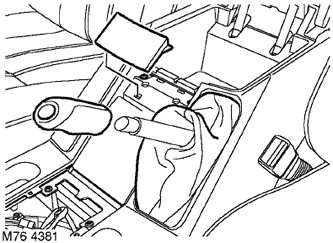
1. Remove an overlay of the selector of an automatic transmission.
PARTS OF THE CAR INTERIOR, REPAIR WORKS, Overlay - selector of an automatic transmission.

2. Release the boot from the parking brake lever handle.
3. Release and remove the parking brake lever handle.
4. Open the lid of the console glove box, release the latches and remove the glove box cover.

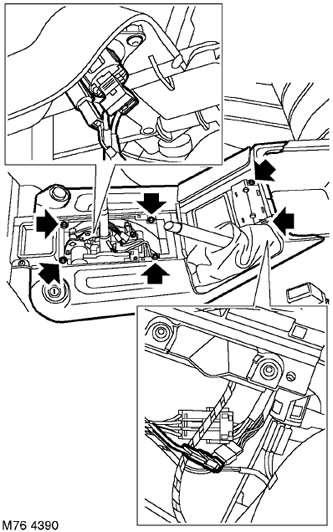
5. Remove the 6 Torx screws securing the trim to the center console and fully apply the parking brake.
6. Release the trim from the clips, lift and disconnect the 3 wire terminals from the accessory power connector.
7. Disconnect the block from the cable connector of the ceiling lamps for lighting the lower shields of the control panel.
8. Remove facing of the central console. NOTE: If disassembly was carried out only to provide access to other elements of the system, then further disassembly operations should not be performed.
9. Remove the 2 Torx screws securing the power socket and remove the socket.
10. Turn out 4 Torx screws of fastening of a ware box and remove a ware box.
11. Remove the 3 Torx cup holder screws and remove the cup holder.
12. Remove the parking brake lever cover.
Assembly
1. Install the cup holder and secure with Torx screws.
2. Install glove box and secure with Torx screws.
3. Install the power socket and secure with Torx screws.
4. Establish a cover of the lever of a lay brake.
5. Position the center console trim and connect the wire terminals to the power socket.
6. Connect the block to the connector of the cable of the ceiling lamps for lighting the lower shields of the control panel.
7. Install console trim and secure with Torx screws.
8. Install the handle on the parking brake lever and secure the lever boot.
9. Establish and fix an overlay of a ware box.
10. Close the lids of the glove box.
11. Establish an overlay of the selector of an automatic transmission.
CAR INTERIOR PARTS, REPAIR WORKS, Pad - automatic transmission selector.
Comments on this article