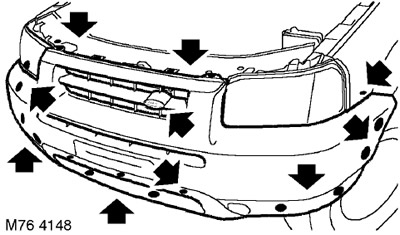
Dismantling
1. Open the hood.

2. Remove the 8 screws securing the fender liner to the bumper and remove the fender liner to provide access.
3. Remove the 2 screws securing the bumper to the brackets of the lower engine protection shield.
4. Turn away 3 self-tapping screws of fastening of a bumper to a crossbar.
5. Turn away 2 bolts of fastening of a back part of a bumper to a wheel arch.
6. Turn away 4 bolts of fastening of a bumper to the panel of the lock of a cowl.
7. Models for the US and Canadian market: Loosen the side turn signal repeater, disconnect the electrical connector and remove the side repeater.
8. With a partner, grasp the sides of the bumper, gently lift it up and slide it forward to release the bumper side mounts and clips.
CAUTION: Before removing or installing body panels or banners, be sure to protect adjacent panels to prevent damage to paintwork.
9. Remove the front license plate.
10. Remove the emblem from the grille and discard the clips.
Installation
1. Install the emblem on the grille.
2. Install the registration plate.
3. With the help of a partner, install the bumper assembly.
4. US and Canadian models: Route the side turn signal repeater electrical cable, connect the electrical connector, and install the side repeater.
5. Make sure that the mounting tabs on the bumper fit into their respective slots.
6. Wrap and tighten bolts of fastening of a bumper to wings.
7. Wrap screws of fastening of a bumper to the panel of the lock of a cowl.
8. Screw the screws into the cross member.
9. Install the screws that secure the bumper to the lower engine shield.
10. Install and align fender liner. Tighten their fastening screws.
11. Close the hood.
Comments on this article