Removing
1. Disconnect a wire of weight from the storage battery. For more information, refer to Specification
2. Drain the liquid from the cooling system. For more information, refer to Draining/Filling Coolant and Bleeding the Cooling System (26.10.01)
3. Remove the intake manifold. For more information refer to Intake Manifold (30.15.02)
4. Remove the crankshaft pulley. For more information refer to Crankshaft Pulley (12.21.01)
5. Remove the bottom cooling fan shroud.
- Release the 2 clips on the lower cooling fan shroud.
- Loosen and remove the lower cooling fan shroud from the radiator.

6. Move the A/C compressor support bracket aside.
- Remove 4 bolts.
- Take the item aside and tie.

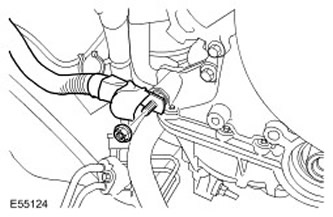
7. Disconnect 2 hoses from the coolant pump.
- Disconnect the coolant flange on the cylinder head to make it easier to remove the coolant hose.
- Remove 3 bolts.
- Move the coolant hoses to the side for better access.

8. Disconnect the engine ground wire. Loosen the nut.

9. Release the transmission line support bracket.
- Loosen the nut.
- Set the item aside.

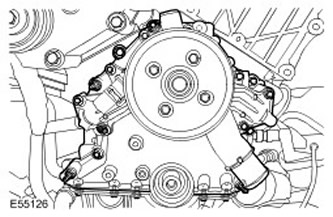
10. Remove the engine front cover.
- Remove 5 pins.
- Remove 4 bolts.
- Turn out 5 bolts of a frame of the block of cylinders.
- Remove the gasket and discard it.

11.
NOTE: Do not proceed with further disassembly if the part is being removed only for access.
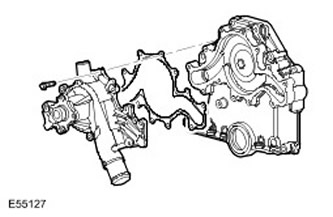
Remove the coolant pump.
- Turn out 12 bolts.
- Remove the gasket and discard it.

Installation
1. Install the coolant pump.
- Clean the contact surfaces of the parts.
- Install a new gasket.
- Tighten the bolts with a torque of 10 Nm.
CAUTION: Be careful when removing sealant from gasket to avoid damaging mating surfaces.
NOTE: The part must be installed within 20 minutes of applying the sealant.
NOTE: Make sure the cylinder block frame gasket is correctly positioned against the front oil seal.
Install the engine front cover.
- Clean the contact surfaces of the parts.
- Clean the gasket contact surfaces with solvent.
- Install a new gasket.
- Apply sealant to the 4 indicated areas.
NOTE: Tighten the bolts in two steps.
Screw in bolts of a forward cover of the engine.
- Tighten bolts and studs evenly and gradually (tightening torque 8 Nm).
- Tighten M6 bolts (tightening torque 10 Nm).
- Tighten M8 bolts and studs (tightening torque 20 Nm).
5.
NOTE: Be careful when making ground connections. In the event of poor ground contact, one or both rows of engine cylinders will not start.
Connect the engine ground wire, making sure that the contact surfaces of the parts are clean. tighten the nut (tightening torque 20 Nm).
6. Install the A/C compressor support bracket assembly.
- Release the wire tie.
- Tighten the bolts (tightening torque 45 Nm).
8. Install the cooling fan shroud.
9. Install intake manifold. For more information refer to Intake Manifold (30.15.02)
10. Fill the cooling system with coolant and bleed air from it. For more information, refer to Draining/Filling Coolant and Bleeding the Cooling System (26.10.01)
11. Connect a wire of weight to the storage battery. For more information refer to Specification
Comments on this article