Removing
1.
WARNING: Do not work on or under the vehicle if it is only supported by a jack. Always place secure supports under the vehicle.
Raise and support the vehicle.
2. Remove the tire wheel.
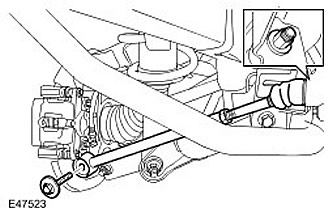
3. Disconnect the toe adjustment rod. Loosen the bolt and discard it.
4. Remove the toe adjustment rod. Loosen and discard the nut.

Installation
1.
CAUTION: Before tightening the toe link nut, make sure the link shank is fully seated in the body frame. Failure to do so will result in damage to the toe link or body frame.
Install the toe adjustment rod. Install new nut and tighten slightly.
2. Attach the toe adjustment rod.
- Using an M14x2 tap, clean the threads of the knuckle fixing hole. Blow out the dirt with compressed air.
- Tighten the new bolt to 175 Nm.
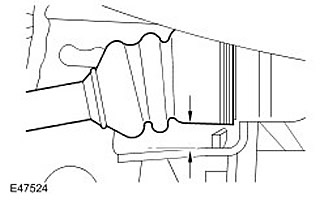
3. Install a gap of 10 mm between the underside of the rubber boot of the toe-adjustment link and the body frame bracket. Tighten the inner ball joint nut of the toe adjustment rod (tightening torque 133 Nm).

4. Install wheel with tire. Tighten the wheel nuts to 140 Nm.
5. Adjust wheel alignment.
Comments on this article