Removing
1. Put the car on a flyover.
2. Disconnect both wires from the battery. For more information refer to Specification.
3. Remove the windshield. For more information refer to Windshield (76.81.01)
4. Remove the front fender. For more information refer to Wing (76.10.24)
5. Remove the front and rear doors as an assembly.
- Disconnect the electrical connector.
- Remove the wiring harness grommet.
- Release the wiring harness clamp.
- Turn out 2 bolts.

6. Remove the fasteners for the front and rear doors.
7. Remove the thermal insulation from the inner and outer bulkheads.
8. Remove the door trim panel. For more information refer to Front Doorway Trim Panel (76.13.27)
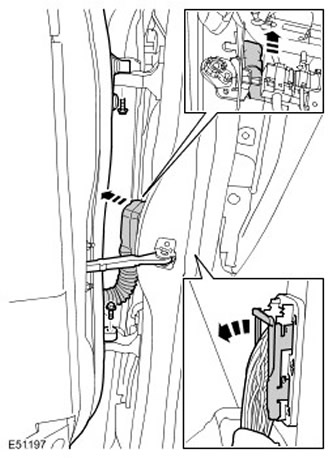
9. Disconnect the wiring harness from the A-pillar.
10. Left side: Remove the battery junction block. For more information refer to Battery Connection Box (BJB) -2.7L Diesel (86.70.55)
11. Right side: Remove the brake booster. For more information refer to Vacuum Brake Booster (70.50.01)
12. Right side: Remove the ABS module. For more information refer to Anti-Lock Braking System Module (ABS) (70.25.12)
13. Right side: Remove the accelerator pedal. For more information refer to Accelerator Pedal (19.20.01)
14. Remove the footrest.
15. Remove the front seat. For more information refer to Front Seat (78.10.44/99)
16. Remove the rear seat. For more information refer to Rear Seat - Vehicle Included: 60/40 Split Seat (78.10.70/78.10.71)
17. Remove the front and rear door seals.
18. Remove the front seat belt pretensioner. For more information, refer to Front Seat Belt Retractor (76.73.13)
19. Remove the second row seat belt pretensioner. For more information, refer to Second row center seat belt retractor - Vehicle includes: 60/40 split seat (76.73.20)
20. Remove the third row seat belt pretensioner. For more information, refer to Third row seat belt retractor (76.73.28)
21. Remove the side impact sensor from the middle pillar of the body. For more information refer to Rack Side Impact Sensor (76.74.23)
22. Remove the curtain-type side airbag module. For more information, refer to Curtain Side Airbag Module (76.74.40)
23. Remove the side impact sensor from the rear pillar. For more information refer to Rack Side Impact Sensor (76.74.24)
24. Disconnect the wiring harness from the middle pillar of the body.
25. Disconnect the wiring harness from the threshold panel.
26. Disconnect the wiring harness from the roof panel.
27. Remove an external overlay of the threshold panel.
28. Loosen the front and rear carpeting.
29. Remove the rear wheel.
30. Remove the rear bumper cover. For more information refer to Rear Bumper Cover (76.22.74)
31. Remove the exhaust grate.
32. Right side: Remove the fuel tank. For more information refer to Fuel tank (19.55.01)
33. Right side: Remove the fuel filler pipe. For more information, refer to Fuel Tank Filler (19.55.07)
34. Right side: Remove the fuel filler flap lock. For more information, refer to Fuel Filler Door Latch (19.55.17)
35. Remove glass of a back window window leaf. For more information refer to Rear Side Window Glass (76.81.20)
36. Remove the exhaust pipe heat shields.
37. Remove the rear door latch. For more information, refer to Tailgate Latch (76.37.19)
38. Remove the rear door seal.
39. With assistance, remove the rear door.
40. Remove the lining of the luggage compartment.
41. Remove the carpet from the luggage compartment.
42. Release the wiring harness.
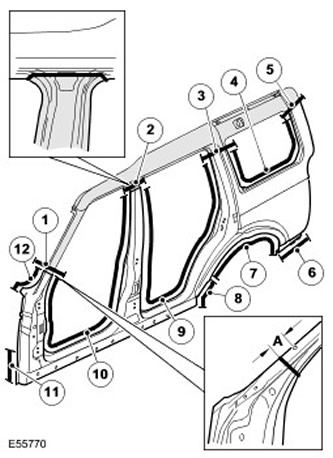
43.

| Item name | Description |
| A | The cutting line runs at a distance of 55 mm (2.165 inches) from the hole in the A-pillar trim. |
| 1 | Butt weld. |
| 2 | Cutting line and butt weld. |
| 3 | Butt weld. |
| 4 | 50 spot welds. |
| 5 | Butt weld. |
| 6 | 5 spot welds. |
| 7 | 40 spot welds. |
| 8 | 9 spot welds. |
| 9 | 100 spot welds. |
| 10 | 98 spot welds. |
| 11 | 8 spot welds. |
| 12 | 15 spot welds. |
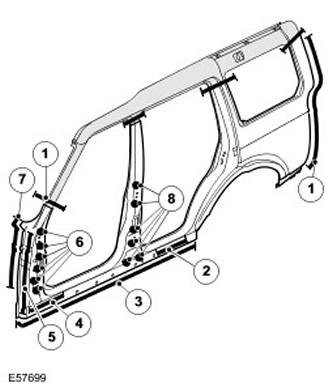
44.

| Item name | Description |
| 1 | 22 plug welds. |
| 2 | 3 plug welds. |
| 3 | 38 cork welds. |
| 4 | 4 plug welds. |
| 5 | 10 cork welds. |
| 6 | 6 cork welds. |
| 7 | 13 cork welds. |
| 8 | 6 cork welds. |
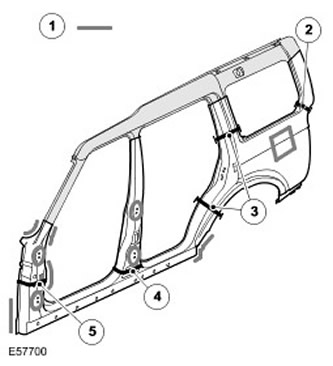
45.

| Item name | Description |
| 1 | Sealing locations. |
| 2 | Noise isolation. |
| 3 | Noise isolation. |
| 4 | Noise isolation. |
| 5 | Noise isolation. |
46. Additional information:
- Weld seam. For more information, refer to Body Repairs.
- Anti-corrosion protection. For more information, refer to Corrosion Protection.
- Tolerances. For more information, refer to Body and frame.
Installation
1. Install in the reverse order to dismantling.
Comments on this article