Removing
1. Put the car on a flyover.
2. Disconnect both wires from the battery. For more information refer to Specification.
3. Remove the rear wheel.
4. Remove the mudguard of the rear wing.
5. Remove the front fender. For more information refer to Wing (76.10.24)
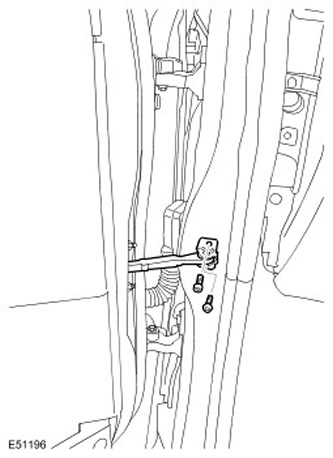
6. Disconnect the front door retainer band from the A-pillar and disconnect the rear door retainer band from the B-pillar.
- Remove 2 Torx head screws.

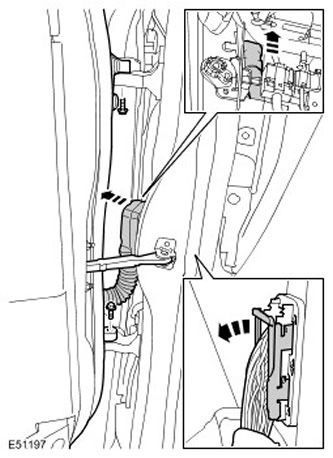
7. Remove the front and rear doors as an assembly.
- Disconnect the electrical connector.
- Remove the wiring harness grommet.
- Release the wiring harness clamp.
- Turn out 2 bolts.

8. Remove the front and rear door seals.
9. Remove the front seat. For more information refer to Front Seat (78.10.44/99)
10. Remove the rear seat. For more information refer to Rear Seat - Vehicle Included: 60/40 Split Seat (78.10.70/78.10.71)
11. Remove the front door trim panel. For more information refer to Front Doorway Trim Panel (76.13.27)
12. Disconnect the wiring harness from the A-pillar.
13. Remove the front seat belt pretensioner. For more information, refer to Front Seat Belt Retractor (76.73.13)
14. Remove the side impact sensor from the middle pillar of the body. For more information refer to Rack Side Impact Sensor (76.74.23)
15. Remove the second row seat belt pretensioner. For more information, refer to Second row seat belt retractor (76.73.23)
16. Remove the side impact sensor from the rear pillar of the body. For more information refer to Rack Side Impact Sensor (76.74.24)
17. Disconnect the wiring harness from the sill panel and the middle pillar of the body.
18. Fold the carpet away from the repair area.
19. Disconnect the wiring harness from the sill panel and the middle pillar of the body.
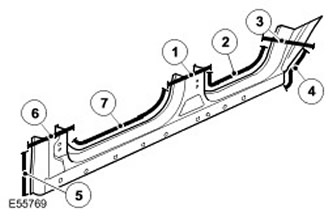
20. Remove an overlay of the threshold panel.
21.

| Item name | Description |
| 1 | Butt weld. |
| 2 | 20 spot welds. |
| 3 | Butt weld. |
| 4 | 9 spot welds. |
| 5 | 8 spot welds. |
| 6 | Butt weld. |
| 7 | 35 spot welds. |
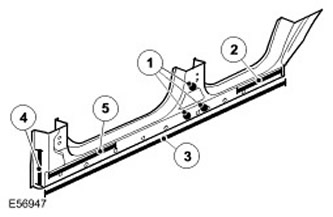
22.

| Item name | Description |
| 1 | 3 plug welds. |
| 2 | 3 plug welds. |
| 3 | 38 plug welds. |
| 4 | 3 plug welds. |
| 5 | 4 plug welds. |
23. Additional information:
- Weld seam. For more information, refer to Body Repairs.
- Anti-corrosion protection. For more information, refer to Corrosion Protection.
- Tolerances. For more information, refer to Body and frame.
Installation
1. Install in the reverse order to dismantling.
Comments on this article